Chocolate Lava Cake Delight
Introduction
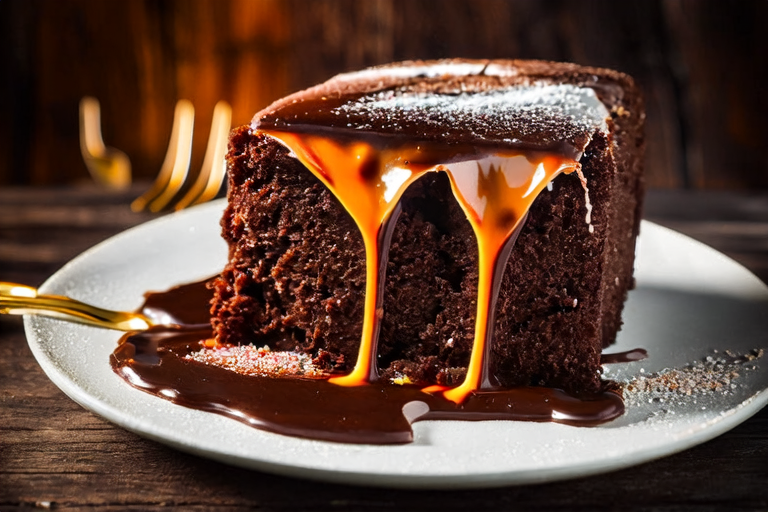
Welcome to our culinary journey today, where we will explore the art of creating the ultimate Chocolate Lava Cake Delight. This dessert is a true indulgence, combining rich, velvety chocolate with a gooey, molten center that oozes out when cut. It’s a classic for a reason, and with this recipe, you’ll learn how to achieve that perfect balance of flavors and textures.
The history of the lava cake dates back to the mid-1980s, credited to French chef Jean-Georges Vongerichten. Since then, it has become a favorite in both fine dining establishments and home kitchens alike. Today, we’re going to take you through the steps to make this decadent treat from scratch, ensuring every bite is as delightful as the first.
Ingredients
To prepare the Chocolate Lava Cake Delight, you will need the following ingredients:
- Dark Chocolate (70% cocoa): The key to achieving that rich, intense flavor.
- Unsalted Butter: Adds richness and helps the cake rise.
- Sugar: For sweetness, use granulated sugar for the batter and powdered sugar for dusting.
- Large Eggs: Provide moisture and structure to the cake.
- Cooking Spray or Butter: To grease the molds.
- Vanilla Extract: Enhances the overall flavor profile.
- Cocoa Powder (Optional): For dusting the molds.
- Whipped Cream (Optional): As a garnish for added indulgence.
Equipment Needed
Having the right equipment can make all the difference in the quality of your Chocolate Lava Cake Delight. Here’s what you’ll need:
- 6-inch round cake molds: These should be oven-safe and ideally non-stick for easy removal.
- Microwave-safe bowl: For melting the chocolate and butter.
- Baking sheet: To place the molds on for even baking.
- Stand mixer or hand mixer: To whisk the eggs and sugar.
- Measuring cups and spoons: For precise ingredient measurements.
- Piping bag (optional): For a professional finish when piping the batter into the molds.
Step-by-Step Instructions
Step 1: Prepare the Chocolate Mixture
Begin by melting the dark chocolate and unsalted butter in a microwave-safe bowl. Place the bowl in the microwave and heat in 30-second intervals, stirring after each interval until the mixture is smooth and fully melted. Be careful not to overheat, as this can cause the chocolate to seize. Once melted, set aside to cool slightly.
Step 2: Whisk Together the Egg Yolks and Sugar
In a separate large mixing bowl, whisk together the egg yolks and granulated sugar until the mixture becomes light and fluffy. This step is crucial as it introduces air into the batter, which will help the cake rise. Continue whisking for about 2-3 minutes until the mixture forms ribbons when lifted with a whisk.
Step 3: Combine the Chocolate and Egg Mixture
Once the chocolate mixture has cooled enough to touch comfortably, pour it into the egg yolk mixture. Gently fold the two mixtures together using a spatula, being careful not to deflate the air bubbles you’ve just created. Fold until just combined, ensuring there are no streaks of chocolate remaining.
Step 4: Whip the Egg Whites
In another clean bowl, whisk the egg whites until they form stiff peaks. This process is essential for adding structure to the cake, helping it hold its shape during baking. Fold the whipped egg whites into the chocolate mixture gently but thoroughly to ensure an even distribution without losing too much volume.
Step 5: Prepare the Molds
Grease the 6-inch round cake molds using cooking spray or softened butter. If desired, dust the molds with cocoa powder for extra flavor and a professional look. Place the molds on a baking sheet for easier handling during baking.
Step 6: Fill the Molds
Using a piping bag or simply a spoon, fill each mold about three-quarters full with the prepared batter. Be gentle to avoid disturbing the delicate structure of the cake.
Step 7: Bake the Cakes
Preheat your oven to 425°F (220°C). Place the filled molds on the preheated baking sheet and bake for approximately 12-14 minutes. The exact timing may vary depending on your oven, so keep a close eye on them. The cakes should be puffed and slightly cracked on top but still have a soft, undercooked center.
Step 8: Serve the Cakes
Immediately after removing the cakes from the oven, run a knife around the edges of each mold to loosen the sides. Invert the molds onto serving plates and let them sit for about 1 minute before carefully lifting off the molds. Dust with powdered sugar and serve immediately, optionally garnished with a dollop of whipped cream for added indulgence.
Tips for Success
Creating the perfect Chocolate Lava Cake Delight requires attention to detail. Here are some tips to ensure your cakes turn out beautifully:
- Use high-quality ingredients: The better the quality of your chocolate and other ingredients, the more flavorful your final product will be.
- Control the temperature: Ensure the chocolate mixture is not too hot when combining with the egg yolks to prevent curdling.
- Don’t overmix: Overmixing can lead to a dense cake rather than the light, airy texture you’re aiming for.
- Check doneness carefully: The cakes should be slightly underbaked in the center to maintain the gooey, molten effect.
- Timing is everything: Serve the cakes immediately after baking to enjoy them at their peak.
Variations and Pairings
The Chocolate Lava Cake Delight is versatile and can be adapted to suit various tastes. Consider these variations:
- Flavored Variations: Add extracts like orange, peppermint, or coffee to the batter for different flavor profiles.
- Texture Variations: Incorporate chopped nuts, dried fruits, or even a swirl of white chocolate for added texture.
- Garnish Ideas: Top with fresh berries, caramel sauce, or a drizzle of chocolate for a visually appealing presentation.
- Pairing Suggestions: Serve with a scoop of vanilla ice cream, a glass of red wine, or a cup of espresso for a truly memorable experience.
Conclusion
The Chocolate Lava Cake Delight is more than just a dessert; it’s an experience. With its rich, velvety exterior and molten, gooey center, it promises a moment of pure indulgence. Whether you’re celebrating a special occasion or simply treating yourself, this dessert is sure to leave a lasting impression. Happy baking!


